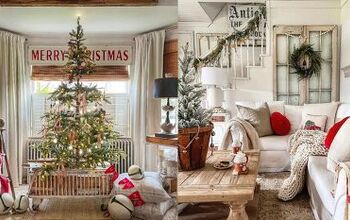
How to Dress a Christmas Tree With Cozy Christmas Decor

Today, I'm showing you the Christmas tree I will be decorating as part of my cozy Christmas decor. I purchased mine probably 5 or 6 years ago, but Hobby Lobby still had it. I prefer an unlit tree because if one strand goes out, I don't lose the entire tree; I can just restring one strand of lights.
That said, you will want to make sure that you fluff and spread the branches well. That is what will give you that designer look to your tree. If you string your lights, make sure that you also string them back into the depths of the tree. Don't just leave them on the outer tips. That will give you a fullness and a designer look. It's this attention to the little details that is going to elevate your tree and make it look high-end.
Cozy Christmas decor
Ribbon
You want to start on the inside and work your way out. You don't see these inner depths so much that bring your Christmas tree to life. I like to use ribbon.

I'm choosing a ribbon with some movement and color to it, but it will also blend into the branches' background.
So, it's not meant to stand out as a statement piece; it is more of a subtle accent. I've unfurled it and tucked it back into the branches, making loops. I want to put it in at a slight diagonal so that it looks like I have wrapped the tree, and I don't want a whole lot of these diagonal ribbon pieces coming around.

Poinsettias
Now, I'm going to add gold poinsettia flowers.
I only have four, so I spread them along the tree as a bold statement piece. This is a 9-foot tree, so you want to remember your scale, and you can use large ornaments and large decorations.
Bows
I'm going to make a ribbon topper. I have looped my ribbon around itself multiple times. I want three loops on each end, so I've created the appropriate folds here. I cut off a smaller length of ribbon, and I'm just tying it around the middle to cinch it up. Then you're gonna spread out the looped ends to form your bow.

Once I have it all fluffed out, I will set it up at the top of the tree using one of the tree branches to secure it in place.
I will then make a second one to put on the back side of the tree. You can see that angle as you come into my living room here, so I want to ensure my tree looks good from all directions.
I'm now taking this satin champagne gold ribbon, making a smaller bow, using the same technique, just using two loops, one on each end, and then cinching it in the middle.

I made a whole bunch of these little bows on a smaller scale than the one on the top of the tree, and I will tuck them into the branches randomly throughout the tree.
I am taking just some straight pieces of ribbon to build out my tree topper and make it elegant and full. I have folded it over varying lengths to give it some dimension and not be so symmetrical and matchy-matchy. Then I'm just taking the loose end of those ties and tucking them in the branches so they cascade down the tree, creating movement and interest as you draw your eye from the topper down the tree.
Color schemes
This particular tree is very neutral in its coloring, but I put up five Christmas trees in my home, so I also have plenty of traditional colors coming your way. I use a lot of red accents at Christmas throughout my home. I sprinkle in gold and black many different elements to my Christmas decorations.

Floral picks
I love to use floral picks in my tree.
I love expanding the decorations away from the tree, and picks do that well. I have spread them out and made them look full. I'm tucking these around the top of the tree here, then randomly working my way down the tree. I'm going to continue sticking these little floral picks out. In addition to building your Christmas tree in layers, consider it a large floral arrangement.

Ornaments
When placing your ornaments, make sure you put them at all different depths, hang some ornaments out on the tips, and bury some ornaments deep into the tree limbs.
This one is very thick, so you can't go back into the depths of the tree, but if your tree is a little thinner you can. If you have gaps; put ornaments back in there. It just gives your tree a high-end designer look with depth and dimension. Spread your colored ornaments out, but putting two ornaments close together of different colors is also okay.
I got black-flocked ornaments from Michaels. They also have a selection of flocked ornaments if they're not already sold out, so check either Hobby Lobby or Michaels and see if you can get your hands on these flocked ornaments. I have a gorgeous tree skirt I've enjoyed for many years.

I also added cream ornaments and that light taupe color to tie in with those picks I put in the tree.
That attention to detail, again, is what will make your tree look designer. I have some ornaments that are large in scale, so for a tree of 9-foot height, that is perfect for adding in. I have an extensive collection of ornaments. Like I said, I put up a lot of trees, so I have a lot of ornaments I've collected over the years.

I have beautiful brown and glitter pinecone ornaments.
As I'm digging through other boxes of decorations, I will probably find pretty ornaments for this tree.

Christmas tree skirt
I used a beautiful Christmas skirt, but I could also use a tree collar.
I think a tree skirt works better when you want to put a lot of presents under here, and that's what I plan to do since this is our main family Christmas tree.


Cozy Christmas decor
I hope I gave you inspiration for your own cozy Christmas decor. What is your favorite part of decorating for Christmas? Share in the comments below.


Comments
Join the conversation