How to Decorate an Elegant White & Gold Christmas Tree

Do you want to learn how to create an elegant white and gold Christmas tree? I will show you how to create a gold and white-themed tree with four steps. It’s a layering process that you can apply to any tree. The layers include a tree topper, ribbon, florals and sprays, and ornaments.
At Decorator’s Warehouse, we used the Natural Elegance bundle to decorate this white and gold Christmas tree.
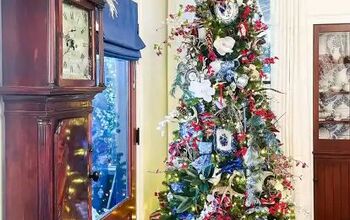
Elegant white & gold Christmas tree

Layer 1: The tree topper
This is a simple floral cluster topper, which is a cluster of two sprays and two flowers. I am going to put this on top of a mid-sized 7½ foot tree.


Layer 2: Ribbon
I have a process I use when I choose a ribbon. I like to layer two styles through the body of the tree. Then I come in with a third ribbon that serves as an accent.
For the inner layer, I’ll choose a simple solid, a repeating pattern, or something textural like this glitter mesh look. The next layer is a pattern. The second layer is the star of the show and it will stand out in the design.
For the accent, I choose a playful, fun pop like this 2½-inch plaid pattern in an ivory and platinum gold colorway to match the other ribbon. The accent ribbon is actually the very last thing I will put on the tree. I will step back and see where I have holes and use it as a filler.

Here’s how I apply the ribbon. I put the top ribbon and bottom ribbon together, I made a diagonal cut at the end, and I started weaving it right under the topper. I make a two-looped bow and use the branch to wrap it around as a starting point. For a 7½-foot tall tree, I will use two to three 10-yard rolls of ribbon.
Of course, use more on fuller, taller trees. Three to four rolls for a 9-foot tree and five to six rolls for a 12-foot tree.


Layer 3: Florals and sprays
Once all the ribbon was placed, I used florals and sprays. I’m repeating the cluster that I used on the topper for consistency. I worked them through the tree in a zigzag formation. A good rule of thumb is one cluster per foot of tree in the body.
For example, on a 7½-foot tree, I want seven of these clusters in the body. Nine clusters for a 9-foot tree and for a 12-foot tree, use 12 to 18 clusters in the body of the tree.


Layer 4: Ornaments
I often am asked how to create a cohesive look with ornaments collected over the years. It’s okay to place them on outer branches to showcase them. I also love shatterproof ornaments. I love closing up holes with different sized and shaped ornaments.


For larger ornaments, I put them deeper into the tree. I push it into the branch to conceal holes. I zigzag through with the largest size first. Then I use mid-size ornaments, then I’ll add my smaller ornaments.


Last detail: The accent ribbon
The last detail is the accent ribbon that I add as filler. I use one roll for this size tree. I can use it in various ways. I made one or two-loop bows with tails to fill in holes.


White and gold Christmas tree
I hope you learned a few tips and tricks on how to create a white and gold Christmas tree. This four-step process is really easy once you get used to it, then you can use it for any color scheme or theme.
If you love this process, let me know in the comments! If you have another layering process, let us know, too. We love to learn new techniques on how to decorate Christmas trees.


Comments
Join the conversation