How to Do a DIY Kitchen Makeover on a Budget

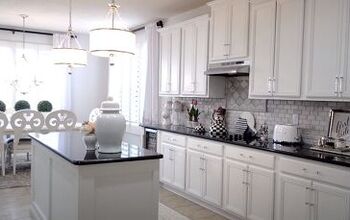
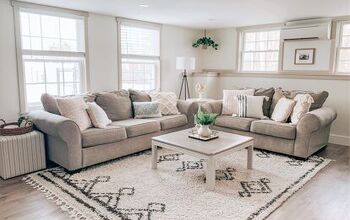
I want to show you our DIY kitchen makeover. When we moved into our house ten years ago, we loved our kitchen. It was a new build, and we loved the footprint, but it just wasn't quite my style. I wanted to lighten and brighten it a bit.

Cabinets and backsplash
So naturally, that meant painting all of our cabinets.

Once I was done painting the cabinets, that led to lots of other DIY projects here, such as adding this faux brick paneling to our backsplash.

Once I mounted it to our existing tile using Loctite, I primed and painted it using Bistro White, and then I added a bit of joint compound around every brick to give them more of an authentic look.


Closed soffit
Eventually, we said goodbye to the open soffit above our cabinets, closing them in with just good old wood and MDF, with a little bit of trim.
We took down the microwave and added this wood vent hood. I just built the wood hood around the working hood using regular wood and underlayment, although it may have been plywood. Our microwave now hides in the cabinet to the right of the refrigerator.

Wall rack
I also built this super inexpensive wall rack or plate rack, mounted it to the side of the cabinet, and used basic trim, 1x2s.


Counters
My latest project was painting the counters. I used epoxy to create a faux calcite marble look, and they were bright and beautiful in the beginning; however, they yellowed pretty severely over time. So last year, I painted over all of that using regular paint, even craft paint, and polycrylic. And I am happy to say that they have held up really nicely. They have not yellowed one bit.
Cabinet Refresh
I'm going to paint another countertop today with your company; only this one is downstairs in our basement.

This piece is from Ikea, and hiding under the black paint is a faux butcher block look.

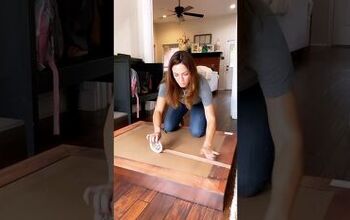
Sanding
The first thing you'll do is sand. I am using a little sanding since this isn't a very large piece because it might be a little less messy, and the dust might not fly as badly as it would if I used the orbital sander.
We're sanding first because we want to knock off the glaze and smooth over any little bumps or ridges. Also, this will allow the primer to adhere to it properly.

Here's what it looks like with a little bit of sanding.
Now I'm just wiping it all down with a wet rag to get all of that sand off.
Prime and paint
Once the countertop dries, you're going to want to add a coat of bonding primer.
Now that the primer is dry, I'm going to take this 220 sand block and gently go over the surface as if I can barely touch it. Doing this removes any bumps and gets it ready for your next coat of paint. Just make sure that after you do that, you wipe it down to get rid of any loose sanding.

Next, I'm going in with my first coat of paint, which is Valspar Bistro White in Satin.
I'm going to sand it one more time again using a 220 and then add one more coat of paint.
Dimensional paint
I let all of that paint dry overnight, and now, it is the fun part. We're going to start adding lots of dimensions, starting with two products.

I have a glaze, a craft paint, a little bit of water, and a sponge.

Take your mixture there, and then dip your sponge into it, and then offload some of that excess into another plate that's on standby. Take that away, and then you're just going to start pouncing little circles onto your countertop.
You want to make sure you work in small sections at a time because you need to work with this product while it's still wet.
So once you've done that, you're going to take a rag, and you're just going to start pouncing if you want. So you're just going to pounce and pull, pounce and pull. Pounce and pull. Pounce and pull. And what you're doing here is you're creating dimension. This dimension will also serve as the perfect base for the veins that we'll add a little bit.

Now that this part is done, I wanted to show you what it looks like.
You can see all the dimension and how it's not all perfect. This gives it lots of depth and character.
Create veins
This is going to dry for just a little bit, and then we'll start adding in the paint. I'm going to take that same mixture I had of the paint, the glaze, and the water, and then I'm just going to roll a feather around in it, dab it off, and then we'll see what happens. Now, the one thing I've learned is you want to start on the side or go at a 45-degree angle. You never want to create a vein that goes straight across or one that looks like a snake. That won't look as authentic.


You want to move your feather back and forth, back and forth. I'm going to take this chip brush and just kind of blot a little bit.
Now, because I'm eventually going to be painting the doors down there a beige, I thought it would be fun to mix in a little bit of a soft brown into the veining as well to kind of tie it all together.

Soften the veins
The next step is to add a little bit of a glaze mixture right on top. So I have a couple of tablespoons of paint. This is the Bistro White, which is what I used as my first coat, well after my primer, on the countertop. Then, I'll take a couple of teaspoons of the glaze. This is Valspar Mixing Glaze Clear.
I'll add in a little bit of water and then stir. You don't want a very thick consistency. You want a thinner one. I'll be applying it with a foam roller.

As you can see, I'm just rolling on the paint glaze mixture and then blotting it off.
You can do that in small sections, but since this is not a very large countertop, I decided to paint all the way down and then blot off the excess. Doing this also adds to the dimension and makes the countertop, especially the veining, look a bit more authentic.

If you see that you didn't carry a vein down on them as you should have, or if you have a tiny artist's brush, you can use it here and roll your hand a little or roll your fingers a little bit.
Polycrylic finish
We went ahead and moved the countertop back downstairs for this last step, which is adding polycrylic. The first thing I'm going to do is lightly sand it with the 220 to rough the surface up a tad so that the polyacrylic will adhere a little bit better.
Then I'm going to use a tack cloth to go over this really gently to make sure I get all of the sanding up so none of it gets sealed in with the acrylic.

The polycrylic I am using is a clear matte.
You could use satin, high gloss, or whatever you like. And I'm going to use just a regular synthetic brush to apply it. I know some people use a foam roller. I have found that that causes bubbles, so my preference is a brush.
You want to gently stir your polycrylic, for like 10 to 20 seconds, being careful not to shake it. You don't want to cause any bubbles.

I'm just going to put my brush down and use it straight out of the can, wiping off excess.
You want to add a very light coat, going in one direction, very gently, because if you don't, you run the risk of having bubbles.

Here's the before photo of the cabinet.

This is the after.
I'll be lightening and brightening a little bit, taking some of the black elements away. I'll go with more of a beige now that I've got that beige in the faux marble countertop; it will all tie together.
Let me know in the comments below if you are painting your countertops. Share your tips and ideas, too; I love to hear from you.


Comments
Join the conversation