Take a Peek Inside This Interior Designer's Own Cottage

Welcome to my personal cottage. I am so excited to share this tour of my home with you today. You're going to see there's a combination of items that look aged but aren't necessarily that with a French Belgian flair.

We’ll start here with the console. It is custom-made and custom-colored.

On top, there are various flea market, warehouse, and garage sale finds that decorate it.

I have taken the glass off the hanging lantern. What I don't like about lanterns is that they collect dust, so this shows the beauty of the shape of the lantern without being distracted by the glass.


Rather than a closet with doors that you would see in a builder-grade house, I have these beautiful wood doors that look like an antique built-in armoire.
And then on the other side, are these shoe cabinets. When guests arrive, there's spots underneath the console for them to line their shoes up, and then there's this piece specifically for shoe storage.

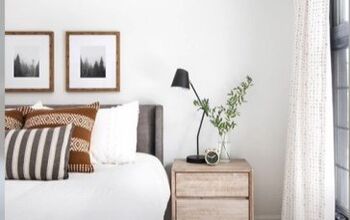
Here's where I have my little gallery wall of the kids and little flea market find frames.
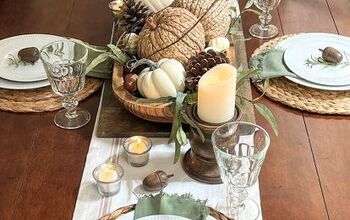
You're always going to see trays on my furniture as well since I find them so handy for corralling stuff, for creating little vignettes, and for putting your cosmetics on.

So, this room in particular is, I think, one of the best examples to show you why it's important to bring a designer in on a project, especially when you're building your own home. I have a lot of clients who buy from builders and bring me in after they've made the purchase on paper. We work together to change the architecture, the layout of rooms, and move walls in order to make the space more livable.

We are on the water, so when we dug, we were limited to how deep we could go because we were hitting the water table. So under this section of the cottage, we only have a crawl space. We did not have a spot for a furnace and water tank and whatnot. And I didn't want to give up an entire room because, with our lot size, we were limited with how big the house could go.

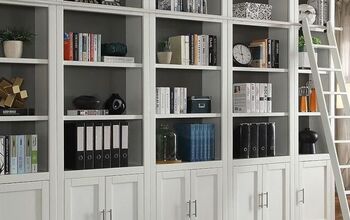
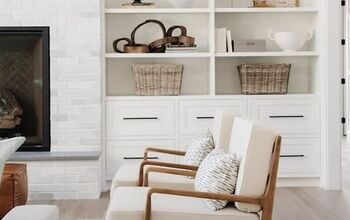
So I came up with this fabulous solution. Behind this wall unit is the stairs to go up to the second floor. Because we don't have a basement and we didn't need another set of stairs going down to it, I have dead space behind here. So I'm going to show you the design decisions that I made with this cabinet and how I got a lot of function into what looks like a simple wall unit. So, let's start off here.

Behind these doors, we have a wet bar. I didn't want it completely exposed because it's our family room. It's a room where we entertain, and I didn't feel that a sink would give me that look of livable luxury that I wanted, and it would take away from the beauty of this whole unit. So, I designed it in a way where we've got our espresso machine, pull-out shelves, and my wine glass holders up here.

And then down below, I've even tucked in a small wine fridge. And then there's our plumbing and garbage on this side.

So if we move along, we've got lighting that we hit switches here.

Back here we've got a beverage refrigerator. Because these are behind closed doors, I didn't need to go fancy. So I got the function and the look.

Next, we've got glasses and our sound system, and it's all open at the back because again, remember, I have dead space back there.

So now we've built in the TV here, storage underneath and up above, our paraphernalia for the TV, and then an inexpensive accessory idea.

I took apothecary jars and filled them with seashells and sea glass that my children and I have collected over many years on our trips to Europe and Florida.

Now, remember, with the TV we've got dead space behind it, so it's very easy for me to access behind and do all the wiring.

On this side is storage like liquor bottles, games, blankets, and whatnot.

Behind this wall unit are our furnace and stairs to our crawl space where our electrical panel and water tank are. This took a lot of work on paper to get the dimensions exactly right so that I didn't hit the stairs.

I wanted this to have the look of something that had been here for many years. So you're going to see that my window cuts into the stringer of the stairs. This was deliberate. I wanted it to look like the upstairs was added over time and the window had already been there.

And then if we look up, we have these incredible beams on the ceiling. So it's a look for sure and one that I wanted, but in this case, it's also functional. In this beam right above me, is a heat duct that carries the heat from the furnace back here to the new part of the house.

So rather than a full beam, what we did is we had the wood logs sliced and we put them together so that there are empty cavities inside. And this is where we ran all our heat ducts and wiring.

And then on the floor, this is reclaimed elm. The beauty of reclaimed floors is that they are bulletproof. There is absolutely nothing that you can do to these that is going to destroy them because they've already got all those beautiful imperfections.

We had the stair treads made out of the same elm so that we had that beautiful flow.
Cottage tour
I hope you enjoyed this tour of my cottage. It is always a good idea to get a designer involved in any home project. And the tour of my personal cottage shows you exactly why that is.
What could you use help with in your home? Share your problem areas in the comments section.
You can find details of the products mentioned in the video description box here.


Comments
Join the conversation