How to Decorate a Glam Christmas Tree

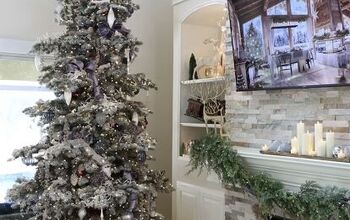
Today, we're creating this beautiful platinum-themed glam Christmas tree for your home. I'm going to teach you our four-step decorating process. The four steps include the tree topper, followed by the ribbon, the florals and sprays, and last but not least, the ornaments.
Table of contents

Tree topper
I have four stems that I've chosen. They consist of this beautiful platinum leaf. When you're choosing pieces for your topper, you want to look for pieces with height, and you also want to look for different textures. I've also chosen this gorgeous berry that will lay on top, and then at the base of the topper, we will include some beautiful florals as well.
For this nine-foot tree, I will use three groupings of this. For a smaller tree, you'll do two of these groupings; for a twelve-foot tree, you'll do five groupings.

I'll start with my tallest stem and turn it down along the pole. I can use some greenery branches to secure that in place and then pull some leaves out.

Then I'll come in with my berry and do the same thing. I will repeat this process on each side.

Ribbon
I've chosen three styles of ribbon. The first one I have is this beautiful metallic paisley. I'll layer it over this gorgeous open weave. Next, I have one more style that I'm going to save until the end to add as an accent ribbon.
I'll use three rolls of each in the body. For a smaller tree, I would use two. On a twelve-foot tree, I would go ahead and use five rolls.

I'm going to start by layering the first two.
I'm going to pinch them together, creating a tail. My tail will be about eight inches. I'll do a simple two-loop bow at the base of the topper. Then you'll come in and twist the ribbon. Next, I will create one more loop, ensuring they're the same size. Again, I'm going to twist to get that front side forward.

We're going to come in at the base, and we're going to secure it with a branch.
You can open your bow up and fluff the loops. I will cut that tail at a diagonal for a decorative touch. Then, I'm going to immediately come in with a larger loop.
What we're going to be doing with the ribbon is making a series of two larger loops. Every run will have at least two larger loops. I've got about 24 inches. I'm going to use the branch to tie it around. That'll hold it in place. We want open, loose loops.

Instead of starting my next loop directly underneath it, I will pull it to the side and create another loop.
I'm cutting with a tail, leaving a tail, and cutting. Since my first series of loops is mainly on this side of the tree, I will come in with my next two loops. I'll offset it a little bit. I'll start in the middle of that area and then come down this way. I'll add that smaller decorative loop here.

As you can see, this one includes two loops, and then I end with a little two-loop bow.
Floral and spray layer
We will use a combination of flowers and sprays to take up big areas of your tree. I'll use the same four stems that we used in our topper: two sprays and two flowers, starting with the sprays. We'll lay them on each other and then marry them slightly.
Bring some forward, some back, so it looks continuous, and then we'll come in with our two flowers. We want to angle the head slightly and to the side.
Then, while holding all the stems together, we'll take one and wrap it around all of them and then pull it back out to get the placement you want. Because these stems are so long, and I don't want them to pop out the other side of the tree, I'll bend that in half.

Next, we'll insert these as one big piece throughout the tree.
I'm using nine sprays in the tree's body on this nine-foot tree. One spray per foot is a good rule of thumb. If you have a 7½-foot tree, use seven throughout the body of your tree, and then when you get into a twelve-foot, I know your base gets quite a bit bigger, so I would say you know anywhere from 12 to 18 stems.
In addition to the floral clusters that I'll do on this layer, I'm going to include a larger single stem, so I'm just going to place them by themselves, and then I have three sprays. First, this gorgeous iced gold berry, next, the silver with the platinum glitter berry, and then this one that pulls them both together. All of these will be placed individually after I do my clusters.

When I place the cluster, I run this stem along the branch and then use the greenery branches to wrap around and hold it in place.
We will zigzag through the tree, so if my first one is over to the left, my second one will be more in the middle, going down in a diagonal pattern.
Now, I'm going to come in with this larger floral. It's a little darker to bring in some depth, and again, I'm alternating in the opposite direction now. Since I have a cluster on one side, my first stem will go on the other side, again zigzagging throughout the tree.

On this nine-foot tree, I'm using about nine of each of these.
Another thing I'm doing, too, is sliding the stem along the greenery, then using the branches and twisting it around to hold it in place. Then, I pull these out and fluff them to create that texture. Next, I'll place them in that same diagonal formation.
Adding the ornaments
These go tucked deeper into the tree to conceal any holes still left and create that depth. I also like to include a few other textures as well. I have about four styles of balls that will go onto this tree and a few other specialty ones that I will do closer to the outside of the branches.

The ball ornaments are so big I can stuff them into the tree, and they're going pretty far deep into the branches. Next, I'll come in with a few different shapes and more specialized ornaments.

I'll hang them on the outsides of the branches to put the finishing details on the tree. Rather than letting them hang long, I'll wrap it around the branch to maintain that control.

Final check
During the ribbon layer, we held onto one roll of ribbon that would be an accent ribbon for the end. I hold on to this until the end because I like to see my fully loaded tree look for holes or spaces anywhere, and I'm going to fill in with this ribbon. You can do a simple tail.
I call these bow ties, where you leave about eight inches on each side. You can do that one-loop bow, so start with the tail again, do a loop, a twist, and cut. Or we can add one more loop to make a two-loop bow.. I'll finish the tree with this ribbon, filling in any gaps.
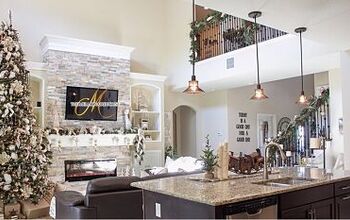
Glam Christmas tree
You are now equipped and ready to take the techniques presented here today and try them out on your own glam Christmas tree. What colors will you be using on your glam tree? Share your style in the comments below.


Comments
Join the conversation